HOW TO CRAFT A SIMPLE TIE-DYE T-SHIRT AT HOME?
DIY Tie-Dye T-Shirt Setup
Add a splash of color to your wardrobe with a DIY tie-dye t-shirt—our simple craft tutorials make it a breeze! At Ezpratik, we say “Easy Pratik, DIY Fun,” and this guide offers an easy DIY craft project to create vibrant, wearable art. It’s perfect for beginners or a fun group activity. Let’s tie-dye your way to style!
WHY CRAFT A TIE-DYE T-SHIRT?
Tie-dye t-shirts are a trendy, personal way to express yourself. Here’s why this DIY craft project rocks:
- It’s affordable—use a cheap shirt and basic supplies.
- It’s creative—mix colors and patterns to your liking.
- It’s quick—finish in a few hours with stunning results.
- It’s versatile—wear it, gift it, or upcycle old clothes.
Plus, tie-dyeing is a fun, messy craft that sparks joy. Ready to get colorful? Let’s gather your supplies!

MATERIALS AND TOOLS YOU’LL NEED
You’ll need just a few items for this DIY craft project—most are easy to find at home or a craft store.
Materials:
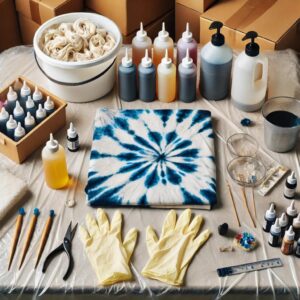
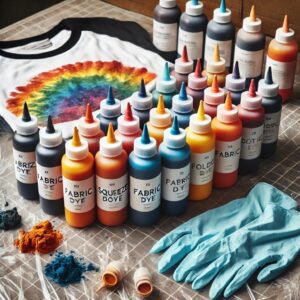
- White Cotton T-Shirt—100% cotton works best for dye absorption.
- Fabric Dye—Multiple colors (grab a tie-dye kit if buying).
- Rubber Bands—To create patterns by bundling fabric.
- Plastic Squeeze Bottles—For applying dye (usually in kits).
- Plastic Gloves—To protect your hands from dye.
- Plastic Tablecloth or Trash Bags—To cover your workspace.
Tools:
- Bucket or Sink—For soaking and rinsing.
- Measuring Cup—To mix dye with water.
- Tongs (Optional)—For handling wet fabric.
Got everything? Great! If not, a quick shop will do. Let’s start tie-dyeing!
STEP-BY-STEP GUIDE TO MAKING YOUR TIE-DYE T-SHIRT
Follow these simple craft tutorials to create a vibrant t-shirt. It’s messy, so have fun!
Step 1: Prep Your Workspace
- Cover your work area with a plastic tablecloth or trash bags.
- Fill a bucket or sink with warm water—keep it nearby for soaking.
- Wear gloves to avoid staining your hands.
A clean setup keeps the mess in check.
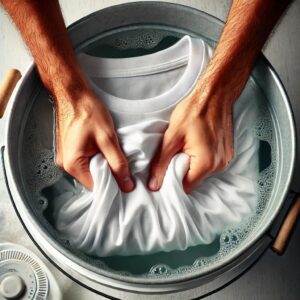
Step 2: Soak the T-Shirt
- Wet your t-shirt in warm water until fully soaked—cotton absorbs dye better when damp.
- Wring out excess water—it should be damp, not dripping.
- Lay the shirt flat on your workspace.
This preps the fabric for dyeing.
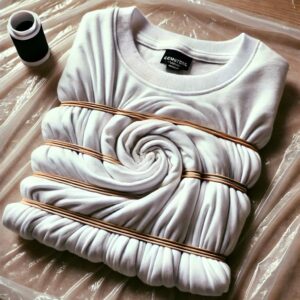
Step 3: Create Your Pattern
- Pinch the center of the shirt and twist into a spiral for a classic swirl—secure with rubber bands.
- Or fold accordion-style for stripes—band every 2-3 inches.
- Try crumpling randomly for a marbled effect—band in sections.
The pattern depends on how you tie—get creative!
Step 4: Mix and Apply Dye
- Mix fabric dye with water in squeeze bottles—follow the dye package instructions (usually 1:1 ratio).
- Apply dye to sections—use different colors for each banded area.
- Flip the shirt and dye the other side—make sure it soaks through.
More dye means brighter colors, but don’t overdo it.
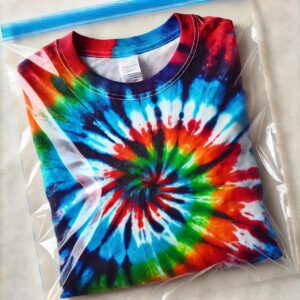
Step 5: Let It Set
- Place the dyed shirt in a plastic bag—seal it to keep it damp.
- Let it sit for 6-8 hours (or overnight) for vibrant colors.
- Keep it in a warm spot—dye sets better with heat.
Patience makes the colors pop!
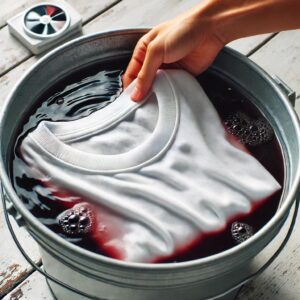
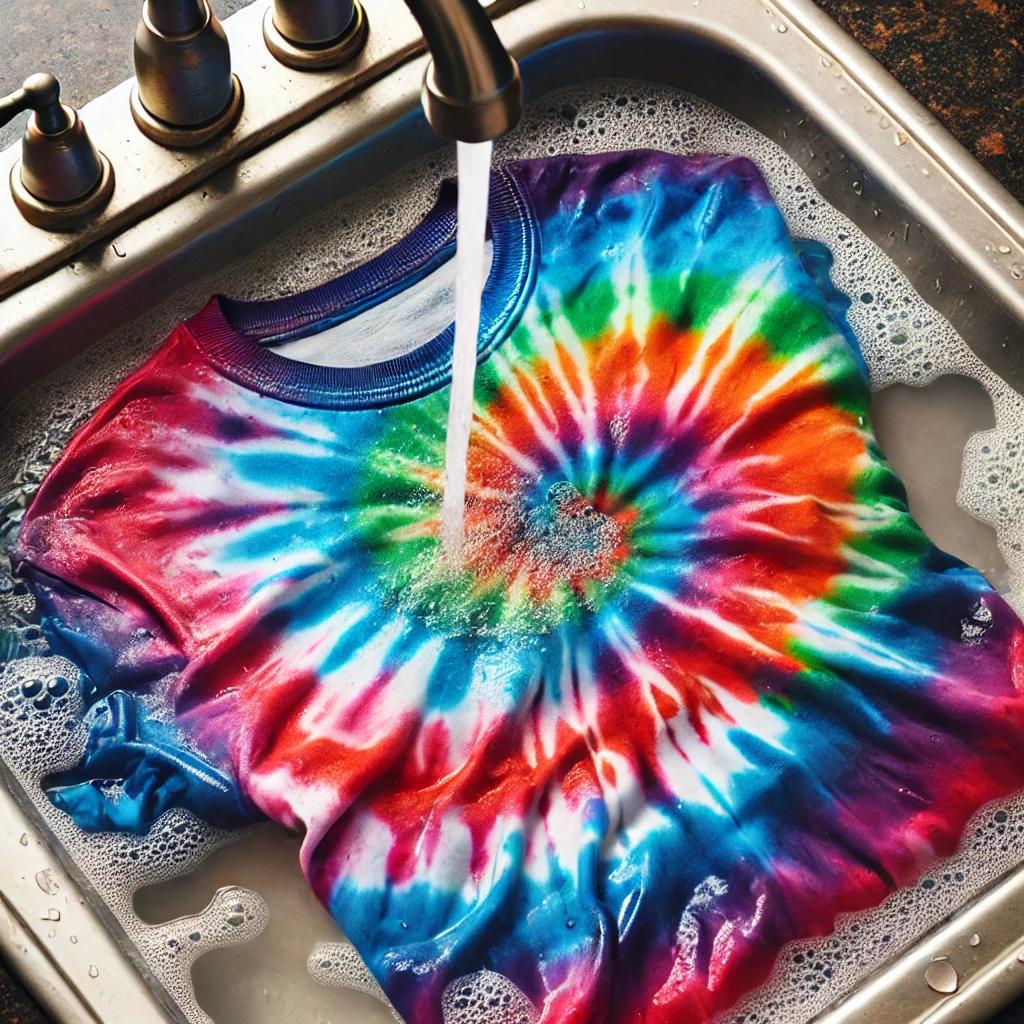
Step 6: Rinse and Wear
- Remove rubber bands and rinse the shirt under cold water until it runs clear.
- Wash separately in cold water with a bit of detergent—dry on low heat.
- Wear your new tie-dye t-shirt with pride!
You’ve created wearable art!
TIPS FOR A PERFECT TIE-DYE T-SHIRT
- Test Colors First—Try dye on a scrap fabric to see shades.
- Don’t Overlap Too Much—Colors can muddy if they mix too much.
- Use Cold Water—Hot water fades dye during rinsing.
- Protect Your Space—Dye stains, so cover everything.
HOW MUCH WILL IT COST?
This DIY craft project is wallet-friendly:
- White T-Shirt: $2-5
- Fabric Dye: $5-10 (a kit lasts multiple projects)
- Rubber Bands: $1-2
- Total: $8-17
Store-bought tie-dye shirts start at $15—you’re saving cash!
OPTIONAL SUPPLIES TO MAKE IT EASIER
Want a smoother dye? Here are two picks from Amazon:
- Tie-Dye Kit—Includes dyes, bottles, and gloves.
- Plastic Squeeze Bottles—Perfect for precise application.
They’re optional but helpful.
PERSONALIZATION AND STYLE IDEAS
Make your t-shirt pop:
- Pastel Vibes—Dilute dye for softer shades.
- Ombre Effect—Fade colors from dark to light.
- Add Glitter—Sprinkle fabric-safe glitter before dye sets.
- Tie-Dye Socks—Use leftovers to dye matching socks.
Your shirt, your style—get colorful!
CREATIVE TWISTS TO TRY
Take it up a notch:
- Bleach Tie-Dye—Use bleach on a dark shirt for reverse dye.
- Heart Pattern—Fold into a heart shape before banding.
- Ice Dye—Sprinkle dye powder over ice for a watercolor look.
Experiment and see what works!
CONCLUSION: YOUR TIE-DYE T-SHIRT SHINES
Crafting a tie-dye t-shirt at home is a simple, vibrant way to create wearable art. With Ezpratik’s simple craft tutorials, you’ve made a handmade craft to rock or gift. What’s your next colorful project?
Would you like to see more handmade HOME DECOR tutorials?
Click to See More DIY Crafts Projects!
Click to See More DIY Home Decor Projects!
Click to See More DIY Grow Easy Projects!
Click to See More Sparkle DIY Projects!
Click to See More DIY Kids Craft Projects!
Similar Posts
- How to Create a Handmade Bookmark with Fabric Scraps?
 WHY CREATE A HANDMADE BOOKMARK? Handmade bookmarks add a personal touch to your reading. Here’s… Read more: How to Create a Handmade Bookmark with Fabric Scraps?
 - DIY Polymer Clay Earrings at Home
 WHY MAKE DIY POLYMER CLAY EARRINGS? Polymer clay earrings are a fun, fashionable way to… Read more: DIY Polymer Clay Earrings at Home
 - How to Create a Handmade Greeting Card?
 WHY CREATE A HANDMADE GREETING CARD? Handmade greeting cards add a personal touch to your… Read more: How to Create a Handmade Greeting Card?
 - How to Make a Felt Keychain with Handmade Charm?
 WHY MAKE A FELT KEYCHAIN? Felt keychains are adorable, practical, and easy to craft. Here’s… Read more: How to Make a Felt Keychain with Handmade Charm?
 - DIY Bath Bombs: a Simple Craft Tutorial
 WHY MAKE DIY BATH BOMBS? Bath bombs add luxury to your bath while being easy… Read more: DIY Bath Bombs: a Simple Craft Tutorial